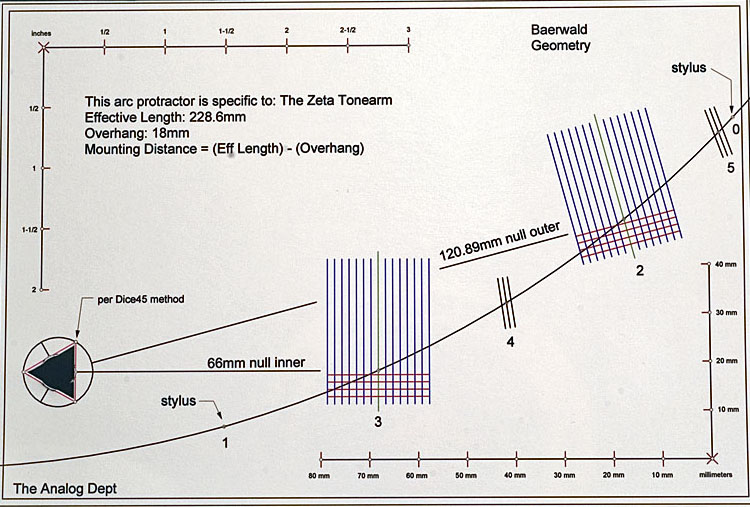
-edible zone-

Above photo is not to scale and is specific to the Zeta Tonearm. The below photo sequence is specific to a Jelco SA370H (nice little arm, and not too expensive, btw)
(hint: click on thumbnail to view image full size)
Using the TAD Arc Protractor. The Jelco SA370H shares its alignment
geometry with Rega RB250 thru RB1000 tone arms. TAD arc protractors are
drawn for the individual tone arm and are --not-- interchangeable for
other tone arms....... unless the tonearm shares its mounting and
alignment geometry with that of another. It happens. Just be sure that
the arc protractor in use is for your make model tone arm.
Null
points and overhang settings on this protractor are per the Baerwald
calculations (also known as Lofgren A)
Effective Length: 239mm
Overhang: 17.3mm
Mounting distance = Eff. Length - Overhang
inner
null: 66mm
outer null: 120.89mm
Set Vertical Tracking
force to the recommended setting using an appropriate scale
First,
place a wedge under the platter so that it may not rotate. Note also
that a "disposable record" is used as a "work surface" beneath the
protractor. Secure the protractor so that it will not rotate when you
don't want it to. In this session I used 3 quarters to weigh down the
protractor over the record surface.
Adjust the protractor and arm so
that point zero and point 1 at the outer boundaries of arc travel match
to the stylus without moving the protractor.
From this point forward
the protractor remains stationary and it is the cartridge that is
adjusted within its headshell so that it may precisely hit all the
alignment points of the protractor. In fact the stylus should rest on
top of the arc line at any point on it once correct adjustment is done.
At the inner and outer nulls adjust "zenith angle" of the cartridge by
swiveling it one direction or the other so that the alignment grids of
the protractor run parallel to the cantilever.
(hint: click on thumbnail to view image full size)
point 2 (outer null) Cantilever is in-line with grid marks
point 3 (inner null) Cantilever is in-line with grid marks.
(hint: click on thumbnail to view image full size)
wide
sequence shot of the 6 alignment checks
Once satisfied with the overhang and zenith adjustment, double check vertical tracking force, Next we'll need to set vta/sra.